ubuntu16.04下安装配置NS3

NS3安装

最开始按照同学的blog进行安装:

安装依赖库

  • 更新apt
1
sudo apt-get update
  • 安装相关依赖
1
2
3
4
5
6
7
8
9
10
11
12
13
14
15
16
17
18
19
20
21
22
23
24
25
26
27
28
29
30
31
32
33
34
35
36
37
38
39
40
41
42
43
44
sudo apt-get install gcc g++ python python-dev  #C++和python

sudo apt-get install mercurial #NS3代码维护使用的源码版本控制管理系统
sudo apt-get install qt5-default mercurial

sudo apt-get install bzr #运行python绑定ns-3-dev需要bazaar这个组件
sudo apt-get install autoconf cvs unrar

sudo apt-get install gdb valgrind #调试工具

sudo apt-get install gsl-bin libgsl-dev libgsl23 libgslcblas0 #支持更多精确WIFI模块的GNU Scientific Library (GSL)

sudo apt-get install flex bison libfl-dev #仿真必需的词法分析器和语法分析生成器

sudo apt-get install g++-3.4 gcc-3.4 #Network Simulation Cradle (nsc) stacks需要gcc-3.4

sudo apt-get install tcpdump #读取pcap的packet traces

sudo apt-get install sqlite sqlite3 libsqlite3-dev #支持统计特性的数据库软件

sudo apt-get install libxml2 libxml2-dev #xml的配置存储软件

sudo apt-get install libgtk2.0-0 libgtk2.0-dev #基于GTK的配置系统

sudo apt-get install vtun lxc #在虚拟机and ns-3上测试

sudo apt-get install uncrustify #代码风格检查程序

sudo apt-get install doxygen graphviz imagemagick #文档生成器

sudo apt-get install texlive texlive-extra-utils texlive-latex-extra texlive-font-utils texlive-lang-portuguese dvipng latexmk

sudo apt-get install python-sphinx dia

sudo apt-get install python-pygraphviz python-kiwi python-pygoocanvas libgoocanvas-dev #Gustavo’s ns-3-pyviz的可视化软件

sudo apt-get install libboost-signals-dev libboost-filesystem-dev #支持openflow 模块

sudo apt-get install openmpi-bin openmpi-common openmpi-doc libopenmpi-dev #支持基于MPI的分布式仿真

sudo apt-get install gir1.2-goocanvas-2.0 python-gi python-gi-cairo python-pygraphviz python3-gi python3-gi-cairo python3-pygraphviz gir1.2-gtk-3.0 ipython ipython3

sudo apt-get install cmake libc6-dev libc6-dev-i386 libclang-dev llvm-dev automake pip
sudo pip install cxxfilt

在安装依赖的时候遇到一两个错误,根据提示进行了包的替换,有的则直接略过了,等到以后需要的时候再装。

安装NS3

  • 安装NS3包括创建目录、进入目录、下载压缩包、解压
1
wget http://www.nsnam.org/release/ns-allinone-3.28.tar.bz2tar xjf ns-allinone-3.28.tar.bz2

编译NS3

  • 进入ns-allinone-3.28目录:

    1
    ./build.py
  • 进入ns-3.28目录:

    1
    ./waf distclean #清除整个build目录./waf configure --build-profile=debug --enable-examples --enable-tests #打开debug并开启例子及帮助./waf build

测试并运行相关程序

1
./test.py -c core  #测试./waf --run hello-simulator  #运行hello-simulator程序

NS3配置

下载Eclipse

第一次在eclipse中配置Mercurial的时候提示出错:(具体见

1
Cannot complete the install because one or more required items could not be found. Software currently installed: MercurialEclipse 2.5.2.201806082050 (mercurialeclipse.feature.group 2.5.2.201806082050) Missing requirement: MercurialEclipse 2.5.2.201806082050 (com.vectrace.MercurialEclipse 2.5.2.201806082050) requires 'bundle org.eclipse.jface.text 3.11.0' but it could not be found Cannot satisfy dependency: From: MercurialEclipse 2.5.2.201806082050 (mercurialeclipse.feature.group 2.5.2.201806082050) To: com.vectrace.MercurialEclipse [2.5.2.201806082050]

原来是eclipse的版本问题,Mercurial在Eclipse Neon (4.6) 才第一次发布。

所以重新安装了Eclipse的最新版本,安装教程参考此文

导入项目

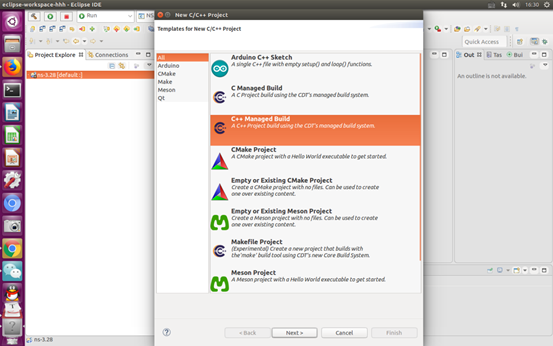
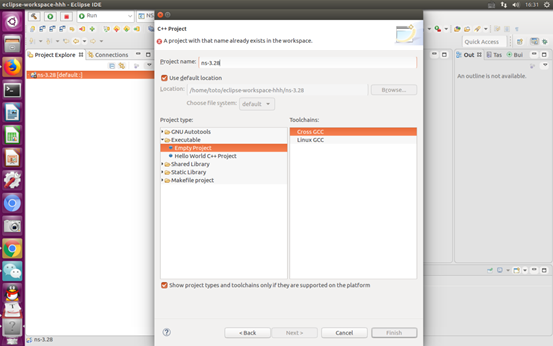
将NS3项目复制到eclipse的workspace,同时在eclipse中新建项目File--New--C/C++Projec, 项目名称与NS3项目名称相同。

image-20200103105339513

image-20200103105418681

用waf编译NS3项目

(不知道这一步是不是必要的)

在该项目中找到waf文件所在文件夹目录,在该目录中打开终端,依次敲以下命令。

1
2
3
./waf configure
./waf clean
./waf build

注:若显示无权限 则在以下界面打开终端,输入 sudo chmod 777 ns-XX —R

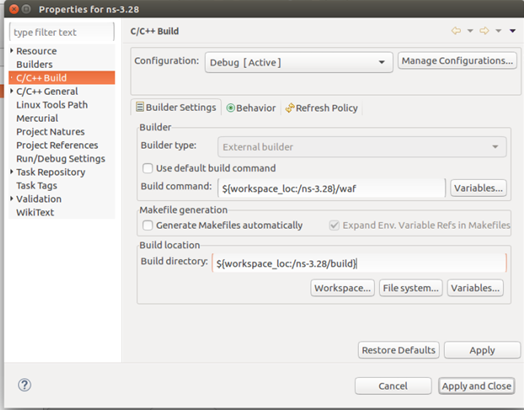
Eclipse 中 设置NS3 编译器为 waf

在 Project Explorer 中的 NS3 上单击右键,选择 properties,配置如图所示

image-20200103112510368

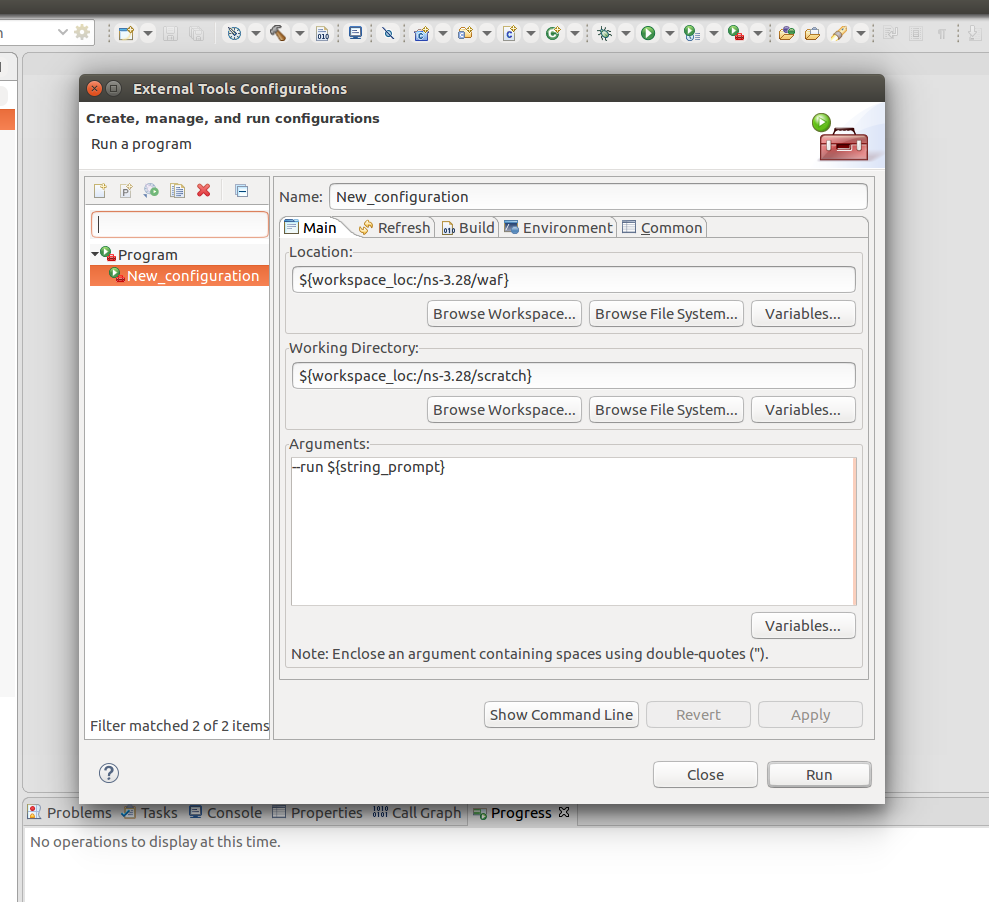
配置Eclipse 执行程序使用外部工具

Run->External Tools->External tools Configuration,配置如下
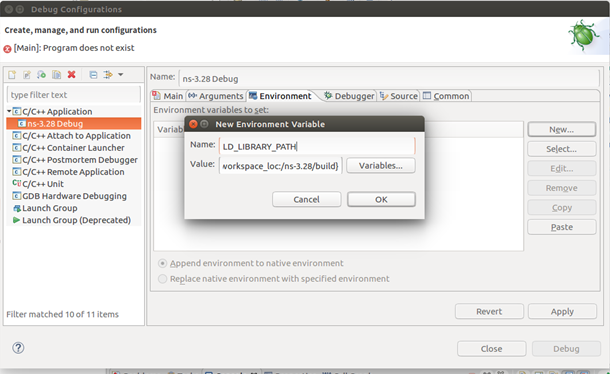
image-20200103111208090

配置Debug

置Debug时 C/C++Application处的文件路径要精确到需要Debug的c++文件名

image-20200103112438631

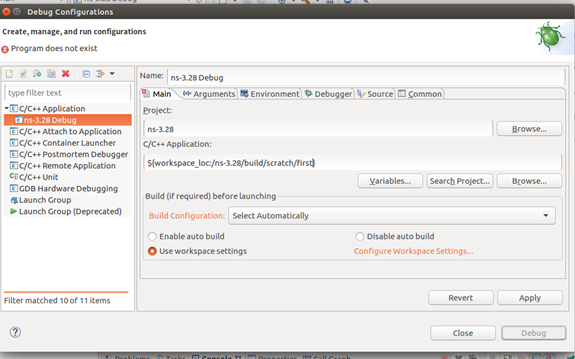
然后选择Environment 进行配置

image-20200103112429090